

The GAPS Intro stages aren’t a countdown to finishing GAPS. They’re six steps that track how your kitchen changes: more foods, more textures, and more ways to prepare a meal as things progress. Our family worked through Intro at our own pace, mostly around how our child with eczema was doing, and this guide explains the foods and preparation methods that change at each stage. If you want all six stages in one place while you cook, keep my printable Intro and Full GAPS food list nearby.[1]
What the Six Stages of GAPS Actually Track
Each stage adds to the one before it. Continue foods you have already introduced and tolerate; you do not need to tolerate every food on a stage before moving forward. The stages follow response rather than a fixed calendar. If an addition brings old symptoms back, the book says to wait a week and try again; if digestive symptoms return after moving forward, go back and stay on the previous stage longer.[1] For example, a simple note can record the new food, its preparation, the amount tried and the response. That record helps you keep track; it is not a new readiness test.
Three things decide where a food lands: the ingredient itself, its form, and how you prepare it. An apple can be cooked, juiced, or eaten raw, and those are three different points in GAPS. Nut butter and nut flour aren’t interchangeable just because they come from the same nut. A vegetable simmered in stock is a different food, for GAPS purposes, than the same vegetable raw in a salad.
The book describes three parts of Intro working together: nourishing the gut lining, reducing irritating fiber while it heals, and introducing beneficial microbes through probiotic foods. Its examples of nourishment include amino acids, gelatin, glucosamine, collagen, fats, vitamins and minerals. That is why this stage map concerns the preparation of complete meals, not only a list of exclusions.[1]
How to Use This Stage Map
Use the stage sections below to see which foods and preparation methods are added at each step. Continue the foods you have already introduced and tolerate.
Keep the stage list beside you. Get the Intro and Full GAPS Food List for planning meals and shopping.
Before You Start the GAPS Introduction Diet
Intro is not the starting route for everyone. Use the Intro-versus-Full starting-situation guide for that choice. The stage lesson below describes what changes once you are following Intro.
Source-Defined Starting Situations and Exceptions
GAPS’s own guidance[1] describes Intro as a starting point for a gut lining that’s severely damaged and inflamed, the kind of situation behind chronic digestive issues, diarrhea, abdominal pain, reactions to nearly everything eaten, or a bacterial or parasite infection. It’s also positioned as a way to bring inflammation down quickly, since it delivers concentrated nutrients: vitamins, minerals, collagen, gelatin, amino acids, and healthy fats.
During pregnancy, the GAPS FAQ gives Full GAPS as the general route. It also defines an exception for colitis with severe diarrhea, vomiting, and abdominal pain: start Intro from Stage 2, include plenty of animal fats and liver, and introduce homemade kefir gradually from the beginning. Its nursing answer is narrower than a blanket rule: it does not recommend starting Intro while nursing a newborn, says Full GAPS can be followed then, and describes a later Intro route once the baby is eating solids and breast milk is only used for topping up.[2]
The 2020 book separately names chronic constipation as a reason to start with Full GAPS, then attempt Intro after the constipation is resolved.[1]
Some people start with Full GAPS for exactly these reasons, or simply because they want more time to learn the cooking style before narrowing the menu further. That’s a reasonable way in, and it’s a different decision than skipping around within Intro itself once you’ve started it.
Stage 1: Stock, Soup, and Cooked Food
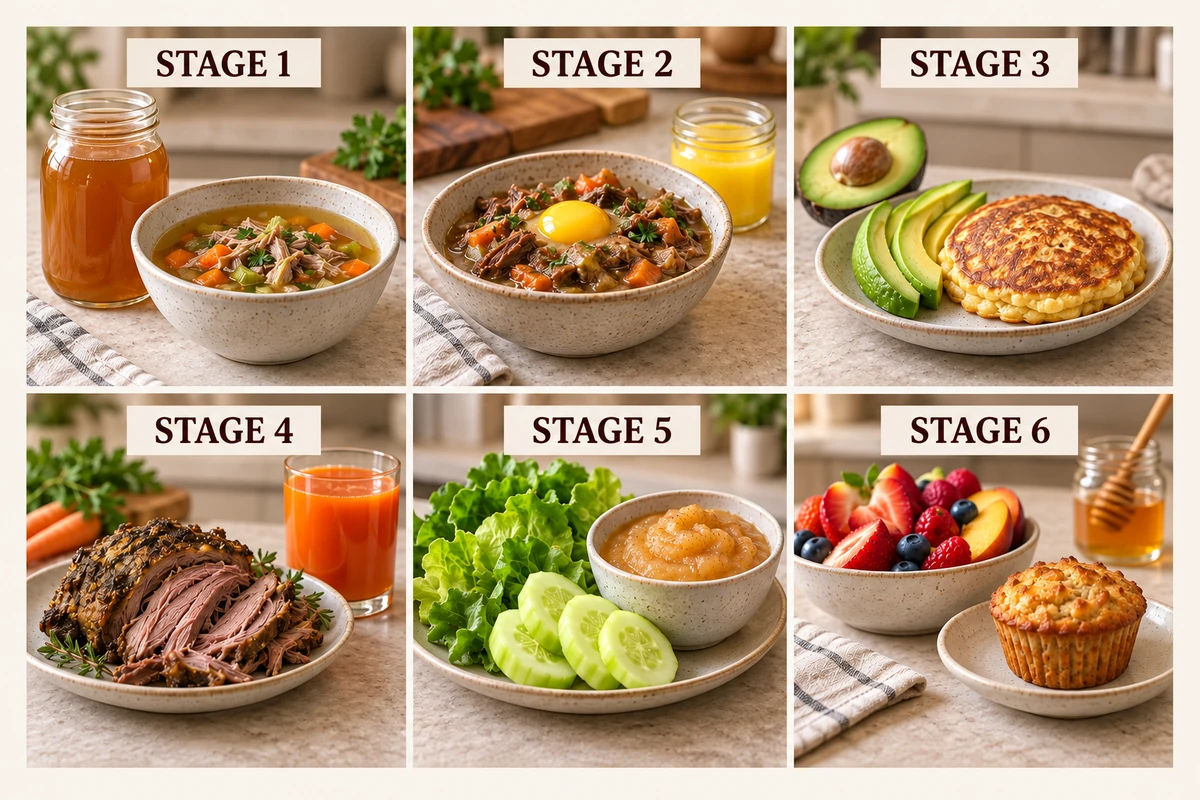
Stage 1 is built around homemade meat or fish stock, stock-based soup, boiled meat or fish, soft tissues from the bones, well-cooked non-fibrous vegetables, natural animal fats, and probiotic foods introduced gradually. Ginger, mint, or chamomile tea with a little honey can be used between meals.[1]
- Use meaty bones, joints, and meat on the bone for stock; consume the fat, marrow, and gelatinous tissues.
- Cook soup vegetables until very soft and remove tough peels, seeds, stalks, and other fibrous parts.
- Begin probiotic foods in small amounts, using fermented-vegetable juice. Uncooked solids wait, but the book permits a handful of homemade fermented vegetables cooked in stock with the fresh soup vegetables.
- Profuse Watery Diarrhea: the book gives a Stage 1 route without vegetables until the diarrhea starts settling.
GAPS meat stock is the protocol preparation here, rather than a long-simmered bone broth. The cuts and timing matter, so a carton labeled broth is not automatically equivalent. These bullets summarize preparation; use my complete chicken meat stock recipe for ingredients, quantities and cooking steps.[3]
The complete Intro Stage 1 guide gives that stage’s food forms, amounts and preparation details.
Stage 2: Stews, Herbs, and Egg Yolks
Stage 2 keeps Stage 1 foods and adds raw organic egg yolks, soft-boiled eggs after yolks are tolerated, long-cooked stews and casseroles, fermented fish, and homemade ghee.[1]
- Start with one raw organic egg yolk a day, separated from the white, and increase gradually toward a yolk in each bowl of soup or cup of stock.
- After yolks are tolerated, add soft-boiled eggs with the whites cooked and the yolks still runny.
- Cook stews and casseroles slowly for at least 2.5 hours with salt and fresh herbs, without spices, and include plenty of animal fat.
- Continue increasing tolerated probiotic foods; add fermented fish gradually and introduce homemade ghee gradually.
The complete Intro Stage 2 guide gives that stage’s food forms, amounts and preparation details.
Stage 3: Avocado and the GAPS Pancake
Stage 3 keeps the earlier foods and adds ripe avocado, GAPS pancakes, gently fried or scrambled eggs, and the solid fermented vegetables whose juice was introduced earlier.[1]
The bullets below are preparation summaries, not measured recipes. For the three-ingredient pancake, open Chapter 13, “Third Stage”, in Gut and Physiology Syndrome. Use the complete preparation for the nut butter you choose; the food-list entry does not supply batter proportions.
- Add avocado to soup from 1 to 3 teaspoons and increase gradually.
- Make the GAPS pancake from organic nut butter, eggs, and peeled, deseeded, blended winter squash, marrow, or zucchini; fry small pancakes gently in ghee or rendered animal fat without burning.
- Cook eggs gently in a generous amount of ghee, goose fat, pork fat, or duck fat. The book’s onion example uses 5 tablespoons of duck fat or ghee and cooks the onion slowly until soft.
- Start sauerkraut or fermented vegetables in a small amount and build gradually to 1 to 2 tablespoons per meal.
The complete Intro Stage 3 guide gives that stage’s food forms, amounts and preparation details.
Stage 4: Roasting, Juice, and Bread
Stage 4 adds roasted or grilled meat, cold-pressed olive oil, freshly pressed juice, and bread made with fermented nut or seed flour.[1]
For bread, the Stage 4 passage is in Chapter 13, “Fourth Stage”. Its flour must be fermented. Chapter 21, “Baking at Home”, explains the GAPS-specific ingredient forms, including ground nuts, whole nuts, precooked cashews and sprouted seeds. Soaking and grinding alone do not meet the Stage 4 fermented-flour requirement.[4] Katz’s Chapter 11 discussion of cultured seed and nut preparations explains how ground nuts and seeds are cultured.[7] For a loaf, use a complete recipe written for fermented nut or seed flour, and follow its ingredient amounts and baking steps as one recipe. The list below explains the stage additions, not a measured bread recipe.
- Add roasted or grilled meat gradually, avoiding burned or overly browned pieces. Barbecued and fried meat are not added here.
- Begin cold-pressed olive oil with a few drops per meal and increase gradually to 1 to 2 tablespoons per meal.
- Begin with a few spoonfuls of clear, well-filtered carrot juice. Build to a full cup a day, then add celery, lettuce, and fresh mint. Drink it on an empty stomach.
- Bake bread with fermented nut or seed flour, eggs, natural fat, and optional peeled, deseeded, finely sliced squash. Start with a small piece and increase gradually if tolerated.
The complete Intro Stage 4 guide gives that stage’s food forms, amounts and preparation details.
Stage 5: Cooked Apple and Raw Vegetables
Stage 5 adds cooked apple purée, selected raw vegetables, and fruit added to the established vegetable juice.[1]
- Stew peeled, cored cooking apples until soft, then add ghee and mash. If ghee has not been introduced, use duck, pork, or goose fat.
- Begin raw vegetables with soft lettuce and peeled cucumber. Once tolerated, add other raw vegetables gradually.
- After the carrot, celery, lettuce, and mint juice is tolerated, add apple, pineapple, or mango. Avoid citrus fruit at this stage.
The complete Intro Stage 5 guide gives that stage’s food forms, amounts and preparation details.
Stage 6: Fruit and More Variety
Stage 6 adds peeled raw apple, then other raw fruit and more honey, followed gradually by allowed cakes and other sweet baking that uses dried fruit as the sweetener.[1]
- Start with peeled raw apple and chew it well.
- Introduce other raw fruit and more honey gradually.
- Add cakes and other sweet things allowed on GAPS gradually, using dried fruit as the sweetener.
- Continue soups and meat stock at least once a day after Intro is completed.
When Intro has been completed and the most pronounced digestive problems have gone, the book directs the move into Full GAPS. Soups and meat stock continue at least once a day. That is a different transition from coming off strict GAPS and introducing non-GAPS foods later.[1]
The complete Intro Stage 6 guide gives that stage’s food forms, amounts and preparation details.
Constipation can also begin after fiber is reduced during Intro. In the chapter’s closing guidance, Campbell-McBride recommends enemas as an immediate remedy and describes regular bowel clearing as part of detoxification. Her complete preparation and exceptions are in “Bowel Management,” which excludes enemas when diarrhea contains blood and mucus. This is a different situation from pre-existing, fiber-dependent chronic constipation, for which she describes starting with Full GAPS first.[1][6]
How Long the GAPS Intro Stages Actually Take
GAPS describes variable timing instead of a fixed number of days. The 2020 book gives the example of moving through Stage 1 in one or two days, then spending two weeks or longer on Stage 2. Some people stay on Stage 2 for a year or more. If digestive symptoms return after moving forward, that is the source-defined signal to step back and stay on the previous stage longer.[1]
That distinction matters once you’re actually working from a meal plan. Cooking a fresh batch of soup on a Wednesday is a kitchen decision. Moving to the next stage that same Wednesday is a separate one, and buying the next ingredient on your list shouldn’t be what decides you’re ready.
Our family worked through Intro over about three months, mostly around how our child with eczema was doing. Those first six weeks were hard. Some of us were very tired, and two of the kids went through a particularly difficult stretch of their own. I have written the fuller timeline, alongside everything else that was going on, in Our GAPS Journey.
For some severe conditions, the book describes a much longer Stage 2 stay, sometimes more or less permanently. It names severe cerebral palsy, Down syndrome, severe autism and Rett syndrome in that discussion. That is a particular source-described route, not the timetable for every person following Intro.[1]
Getting GAPS Stage Foods on the Table
You don’t need every ingredient for a stage sitting in your kitchen at once. Start with a handful of complete meals and the quantities they actually require, then figure out what needs to be ready before the house is hungry again.
For a batch of soup, decide upfront whether you’re making stock to cook with later or a finished soup to eat as-is. If one batch is meant to cover both dinner and the next day’s lunch, set that lunch portion aside right away. It’s easy to count the same leftovers twice when several people are hungry.
Keep prep notes short and specific. “Peeled and simmered” or “brine only” next to a meal name does more work than a long list of links, especially if someone else is helping with food.
The list of foods keeps growing through Intro, but the point of a meal stays the same: enough food, prepared to fit where you are right now. Knowing the stage gives you a clearer starting point for the next thing you cook.
In “Body Wisdom,” Campbell-McBride also describes an individual exception when a person has a strong desire for a natural food outside the present stage. Her example begins with someone following the first or second stage closely and feeling well, then having a strong desire for raw tomato. After that particular need is satisfied, the person returns to the programme. She limits that discussion to natural foods, not processed products. Keep it distinct from the ordinary stage list you use to plan meals. Her following discussion of children asks parents to keep choices within the allowed GAPS food list and offer enough variety for children to explore their own tastes.[5]
The book’s food-form sensitivity-test instructions are covered in my GAPS food-allergy guide. Its raw-yolk example concerns raw yolk, not a whole or cooked egg. The guide also retains the dangerous-allergy exception, so the form test is not read as permission to try a known dangerous allergen.
GAPS Intro Stages FAQ
How Long Does Each GAPS Intro Stage Take?
There is no universal number of days. Use the progression explanation above: continue tolerated foods, record new additions and their response, and return to the previous stage when the book’s symptom-return condition applies.[1]
What’s the Difference Between GAPS Meat Stock and Regular Bone Broth?
GAPS meat stock uses suitable meaty bones and a shorter cooking time than a long-simmered bone broth. The cuts and the timing are part of the method, so a carton labeled “broth” at the store isn’t automatically the same preparation.
When Do Eggs Come into the GAPS Intro Stages?
Raw organic egg yolks, separated from the whites, begin in Stage 2. Start with one yolk a day and increase gradually. Once yolks are well tolerated, Stage 2 adds soft-boiled eggs with fully cooked whites and still-runny yolks. Stage 3 adds gently fried or scrambled eggs cooked in generous ghee or rendered animal fat.[1]
What Happens After Stage 6 of GAPS Intro?
Stage 6 leads into the wider Full GAPS diet, which allows more variety than Intro does. It doesn’t bring back foods GAPS ruled out earlier, like grains, right away. That transition, and eventually coming off GAPS entirely, happens separately and gradually.[1]
Your Next Step
Before you cook anything new this week, look at whichever stage you’re actually on and write down three complete meals you can already make from foods you’ve got covered. Use that list to plan your shopping and prep time. The first-week guide helps turn those choices into a workable meal plan; the GAPS basics guide explains the wider protocol.
References
- Campbell-McBride, N. Gut and Physiology Syndrome (2020), Chapter 13, “GAPS Introduction Diet,” pp. 167–176.
- Campbell-McBride, N. “GAPS Frequently Asked Questions,” sections “GAPS Diet and Breastfeeding” and “Pregnancy.”
- Campbell-McBride, N. “GAPS Diet Recipes for Chronic Physical and Mental Illness,” section “Stock on the GAPS Diet.”
- Campbell-McBride, N. Gut and Physiology Syndrome (2020), Chapter 21, “Baking at Home,” pp. 268–273, ingredient- and form-specific nut, seed, flour and butter preparation methods.
- Campbell-McBride, N. Gut and Physiology Syndrome (2020), “Body Wisdom,” individual natural-food desires while following GAPS.
- Campbell-McBride, N. Gut and Physiology Syndrome (2020), “Bowel Management,” complete enema preparations and the blood-and-mucus stool exception.
- Katz, S. E. The Art of Fermentation, Chapter 11, “Cultured Seed and/or Nut Cheeses, Pâtés, and Milks,” culturing ground nuts and seeds.

16 responses to “The GAPS Intro Stages Explained: A Stage-by-Stage Breakdown”
[…] can make room for a bread or pancake recipe because it's genuinely useful. Our stage-by-stage Intro guide shows where bread-style recipes begin during Intro. You don't need a GAPS-safe stand-in for every […]
[…] the food differences and starting routes, use my Intro-versus-Full comparison. The six-stage guide explains the additions, and my Full GAPS meal guide shows how to build meals. This review focuses […]
[…] my complete guide to the GAPS Introduction Diet to see how Stage 1 fits into all six stages. This article stays with Stage 1 itself: what to make, […]
[…] the six-stage Intro overview to keep this step in […]
[…] the six-stage Intro overview to keep this step in […]
[…] up more foods than Intro allows, so the same two-week plan does not work for both phases. Use the six-stage Intro overview to find your current stage, and come back to this menu once you’ve moved to […]