

These Strawberry Coconut Cheesecake Popsicles turn homemade coconut milk, raw honey, lemon, apple cider vinegar, homemade vanilla, and ripe strawberries into six layered Full GAPS treats. The pale layer tastes tangy and creamy without cultured dairy, while the strawberry layer stays bright enough to keep each frozen bite from feeling heavy.
As a working, homeschooling mom of six, I like a freezer treat that can be counted before anyone asks whether there is enough. This formula fills six standard molds, gives each pop visible fruit-and-cream layers, and can be mixed before the long part of the day begins. Once the molds are in the freezer, the work is finished.
Why This Formula Uses Homemade Coconut Milk
The source offers cashews, pine nuts, or coconut milk for its creamy layer. This Full GAPS card locks the coconut route: 1 1/4 cups homemade full-fat coconut milk replaces both the nuts and their water. That keeps the formula nut-free and avoids publishing several bases inside one card.
Commercial canned or boxed coconut milk can contain gums, starch, sweeteners, preservatives, and other additives. Use homemade milk that has been stirred until the cream and liquid are uniform before measuring. A separated scoop of cream and thin liquid produces different pops from one mold to the next.
The coconut layer also uses raw honey instead of the source’s agave or maple branches. Fresh lemon and additive-free apple cider vinegar supply the cheesecake-like tang. A small amount of linked homemade vanilla extract rounds out the acidity without commercial flavor blends or added sugar.
Full GAPS Placement
These popsicles belong on later Full GAPS after homemade coconut milk, raw honey, raw strawberry, lemon, apple cider vinegar, and homemade vanilla are introduced and tolerated. They do not have an Intro Diet route. Frozen sweets are best treated as an occasional between-meals fruit serving rather than an everyday replacement for the meat, stock, eggs, ferments, and fats that anchor the protocol.
If raw strawberries are not yet comfortable, wait. Freezing does not change a raw berry into an earlier-stage food. A person with diarrhea or abdominal pain should also wait until fruit is appropriate again.
Measure the Two Layers
For the coconut cheesecake layer, measure 1 1/4 cups homemade full-fat coconut milk, 3 tablespoons raw honey, 1 tablespoon fresh lemon juice, 1 tablespoon additive-free apple cider vinegar, and 1/2 teaspoon homemade vanilla. The milk should smell fresh and softly coconutty. The vinegar should smell clean and sharp, without added flavoring.
For the strawberry layer, measure 1 cup ripe strawberries, 1 tablespoon filtered water, and 1 tablespoon raw honey. Fresh berries should smell distinctly like strawberries. Frozen berries work after thawing; include their clean released juice instead of draining it.
Have both glass measuring cups and the mold rack ready before blending. Once the layers are smooth, assembly moves quickly. A level freezer shelf also matters: tilted molds create thin sticks on one side and may let one layer spill over the rim.
Why the Layers Stay Distinct
The coconut mixture and strawberry puree are close enough in thickness to stack without one instantly sinking through the other. The coconut fat gives the pale layer body, while whole blended strawberry keeps the red layer thicker than strained juice. Small pours preserve that balance. A deep pour lands with more force, pushes through the layer underneath, and creates one mixed color.
Work from one mold to the next rather than filling a single mold completely. Add the first coconut portion to all six, then the first strawberry portion to all six, and continue around the rack. That rhythm gives each layer a moment to settle and makes the six finished pops reasonably even without turning assembly into a measuring project.
How to Make Strawberry Coconut Cheesecake Popsicles
1. Blend the Coconut Cheesecake Layer
Put the homemade coconut milk, 3 tablespoons raw honey, lemon juice, apple cider vinegar, and homemade vanilla into the large Ninja BN801 pitcher. Secure the lid and blend for 20 to 30 seconds.
Stop when the mixture is uniformly off-white, lightly glossy, and pourable. Look through the clear pitcher: there should be no dense honey ribbon at the bottom, no oily layer at the top, and no lumps of coconut cream moving separately.
Transfer the mixture to a glass measuring cup with a pour spout. Let the foam settle briefly while you make the fruit layer. Do not wash the blender pitcher; a small trace of coconut mixture softens the strawberry puree without changing its measured formula.
2. Blend the Strawberry Layer
Return the empty pitcher to the base. Add the strawberries, filtered water, and remaining 1 tablespoon raw honey. Secure the lid and blend until the puree is evenly red and no whole fruit pieces remain.
The strawberry layer should be thicker than juice but loose enough to pour in a short stream. Scrape the blender only while it is off and removed from the base. If a berry piece remains under the lid, blend again rather than forcing it through a narrow mold opening.
3. Build the Layers
Set the six stainless-steel molds in their rack on a stable, level counter. Add a small spoonful or short pour of coconut mixture to each cavity, followed by strawberry puree. Continue alternating until every mold is nearly full, leaving a little headroom for expansion.
The layers do not need to be mathematically even. Slightly different thicknesses give the finished pops their striped, homemade look. Keep each pour short so the colors remain distinct instead of turning the entire mold pale pink.
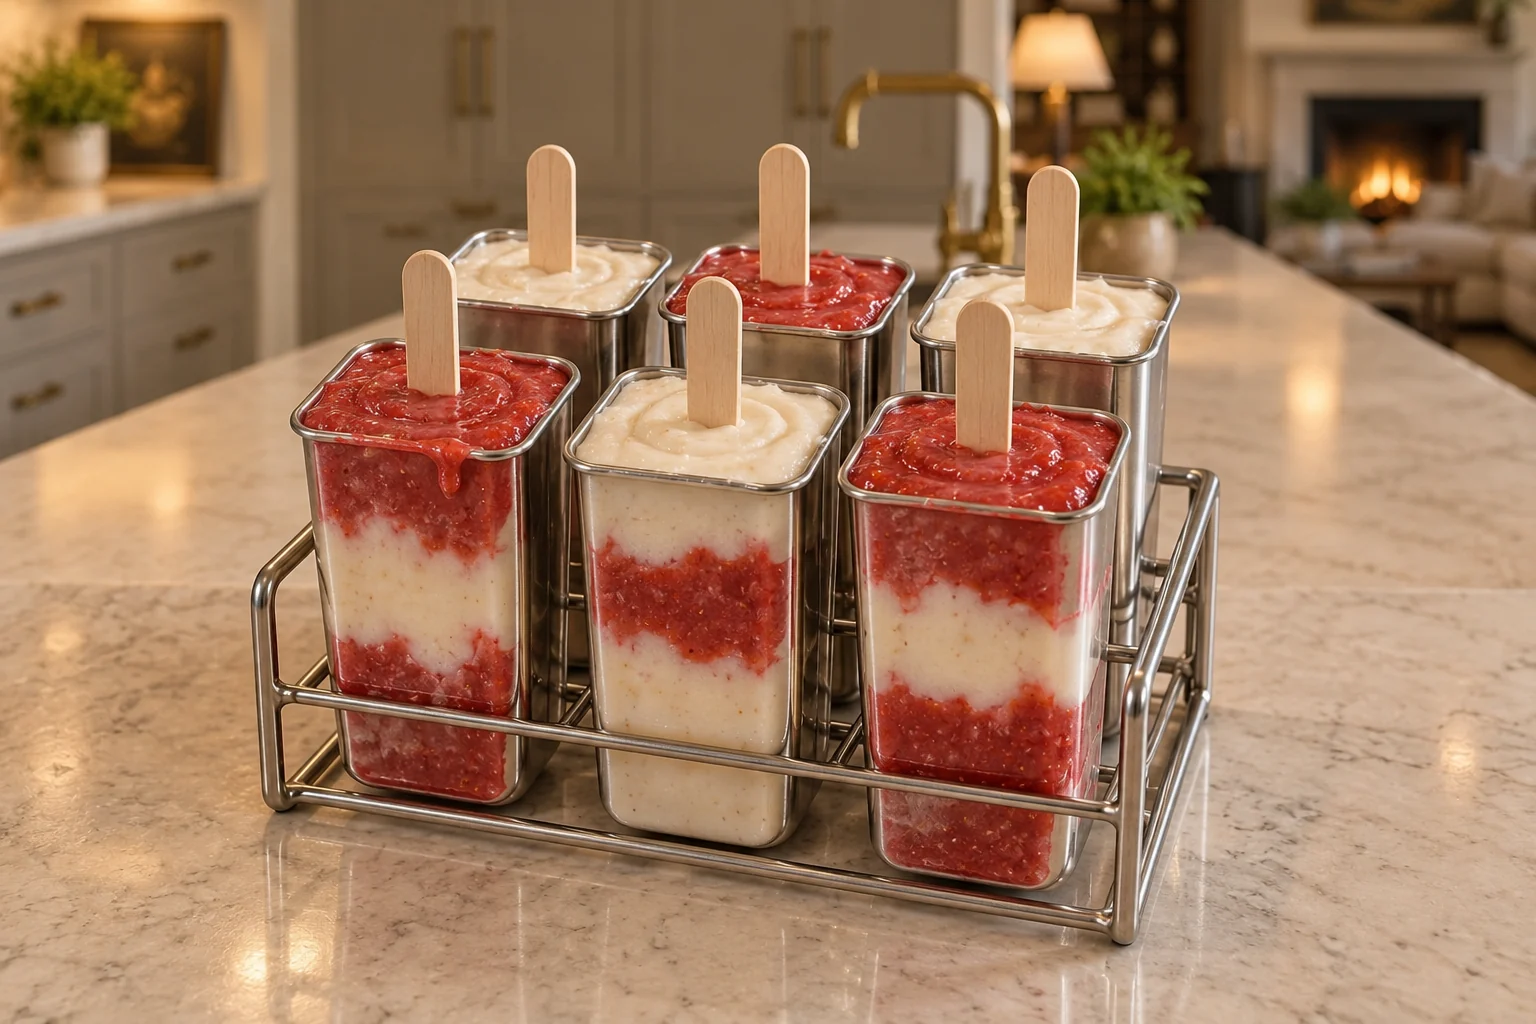
Insert one plain wooden stick into each mold and make sure the rack is level. Wipe any mixture from the metal rim before freezing so the lids release cleanly.
4. Freeze Until Solid
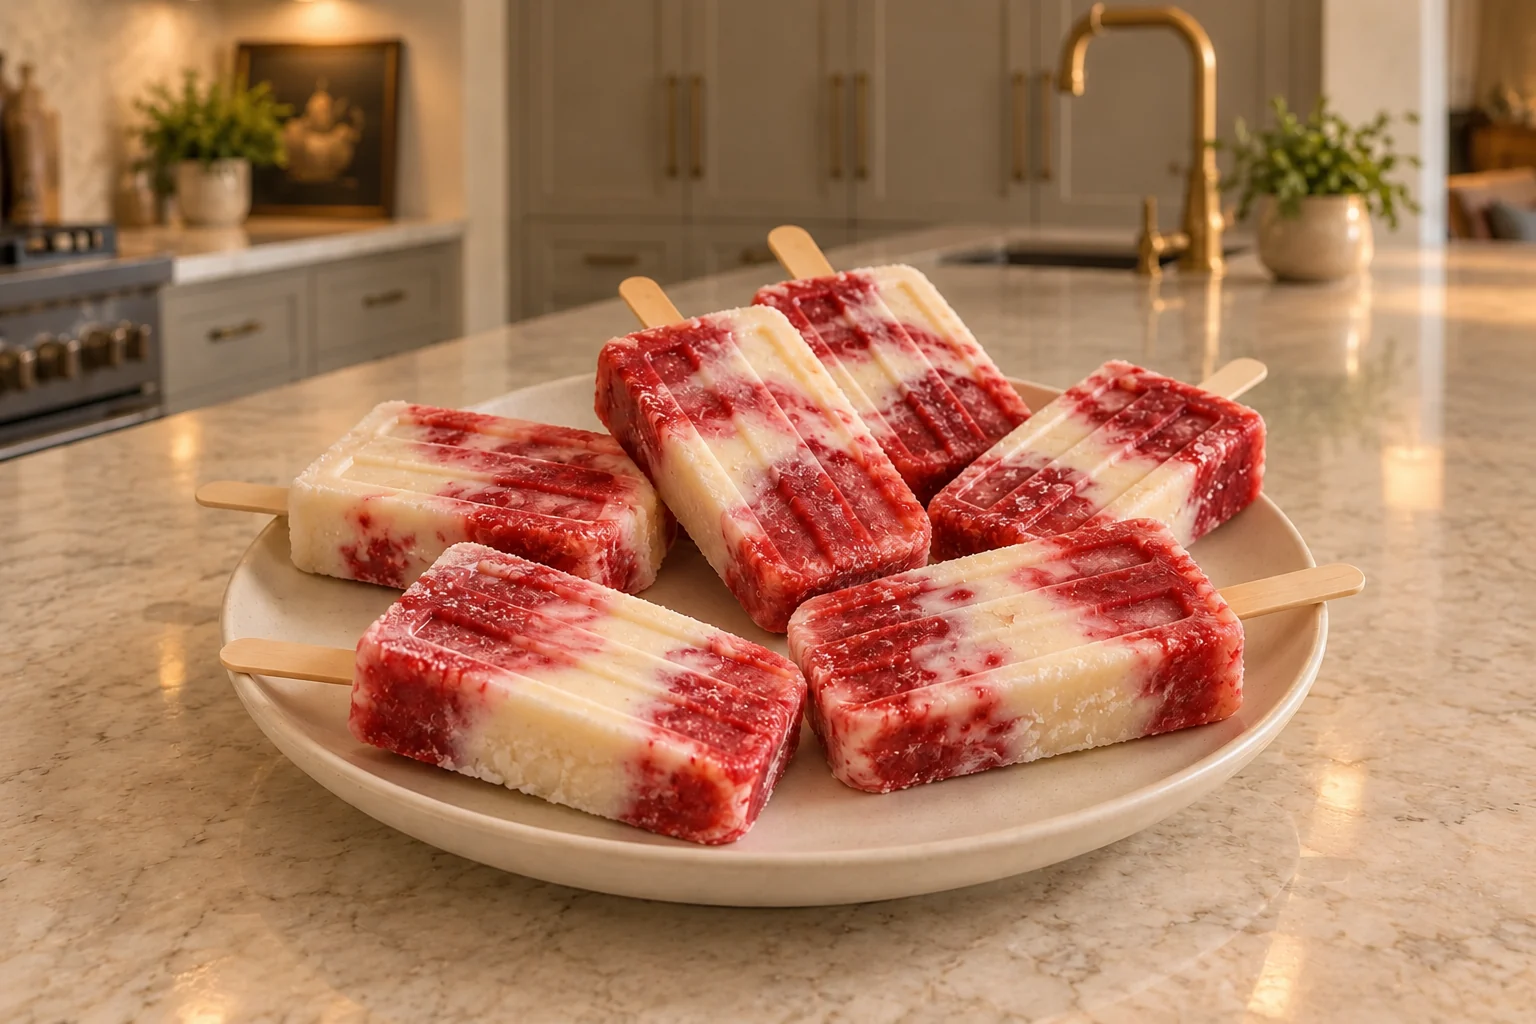
Freeze for 4 to 6 hours, or overnight. A finished pop feels rigid when you press the stick gently and shows no movement at the center. The outside may freeze first while the middle is still soft, so do not judge by the metal mold alone.
To release one pop, warm only the outside of its mold briefly with cool-to-lukewarm water. Pull the stick straight. Hot water melts the outer layer too quickly and can leave the center stuck.
Planning Them Around Family Life
The active work takes about 25 minutes, but the pops need a firm four-to-six-hour freeze. Make them in the morning for an afternoon treat, or assemble them after dinner and leave them overnight. The long freezer time is inactive; it does not require checking, stirring, or turning.
For a gathering, keep the pops in their molds until close to serving. Release them one at a time so the remaining portions stay solid. If children are choosing between flavors, mark the outside of the storage container rather than writing on or decorating the food.
What the Finished Pops Should Taste Like
The pale layer should taste tangy first, then softly sweet and coconutty. It should not taste sharply vinegary. Strawberry brings the bright fruit note and a little texture from fine seeds. Together the layers suggest cheesecake without trying to imitate a commercial frozen dessert.
The frozen texture is firm with tiny ice crystals, not fluffy like churned ice cream. Let a pop stand for 2 or 3 minutes if it is too hard to bite comfortably. The layers should soften at the same pace and remain attached to the stick.
Fruit Adaptations
Replace the 1 cup strawberries with 1 cup blueberries for a purple fruit layer, or use 1 cup ripe peeled peaches for a softer golden layer. Keep the tablespoon of filtered water and tablespoon of raw honey unchanged. These are same-measure fruit adaptations of the card, not additional recipes hidden in the post.
Use only fruit that is ripe and already tolerated. Peach should be peeled, pitted, and chopped before measuring. Blueberries can be fresh or thawed. Blend either route until smooth enough to pass through the mold opening.
Storage
Once frozen solid, keep the pops sealed in their molds or move them to a covered freezer-safe glass container with parchment between layers. Protecting them from open freezer air limits frost and keeps the strawberry aroma fresh.
Use within about 2 weeks for the best texture. Unmold only what you plan to serve; repeated warming and refreezing creates large ice crystals and weakens the wooden sticks.
Frequently Asked Questions
Can I Use Canned Coconut Milk?
Use homemade full-fat coconut milk for this Full GAPS formula. Commercial cans and cartons are not the measured route and may contain additives.
Can I Use Maple Syrup or Agave?
No. Raw honey is the locked Full GAPS sweetener in both layers.
Why Did My Layers Mix?
The pours were probably too large or too forceful. Use small spoonfuls or short pours and aim at the open center of the mold. Slight marbling is normal; a uniform pink pop means the streams displaced the layer beneath them.
Why Will the Pop Not Release?
Warm the outside of one stainless mold briefly, then pull straight. If the stick moves but the pop does not, freeze longer; the center may not be solid.
Can I Double the Recipe?
Use the 2x card amounts and two six-pop racks, or freeze in batches. Do not overfill six molds and call that a doubled batch.
Recommended Equipment
- Ninja Professional Plus Kitchen System BN801
- Measuring cups and spoons
- Two glass measuring cups with pour spouts
- Unbranded stainless-steel six-pop mold rack
- Six plain wooden sticks
- Flexible silicone spatula used only while the blender is off
- A level freezer shelf
More Frozen Full GAPS Treats
Try Strawberries and Cream Popsicles for Full GAPS for a blended rather than layered pop, or Full GAPS Kiwi Sorbet for a spoonable fruit dessert. This recipe also belongs in the planned Kid-Friendly Frozen Treats Recipe Card Deck. Visit the WFLI shop for current resources and upcoming releases.
Strawberry Coconut Cheesecake Popsicles for Full GAPS
Ingredients
Equipment
Method
- Put the homemade coconut milk, 3 tablespoons raw honey, lemon juice, apple cider vinegar, and homemade vanilla in the large Ninja BN801 pitcher. Secure the lid and blend 20 to 30 seconds, until uniformly off-white, lightly glossy, and free of honey streaks or separation. Transfer to a glass measuring cup with a pour spout.
- Return the unwashed blender pitcher to the base. Add the strawberries, filtered water, and remaining 1 tablespoon raw honey. Secure the lid and blend until smooth and evenly red, with no whole fruit pieces.
- Alternate small spoonfuls or short pours of the coconut layer and strawberry layer among six stainless-steel popsicle molds until nearly full. Insert one wooden stick in each mold. The layers should remain visibly irregular rather than completely mixed.
- Freeze on a level shelf for 4 to 6 hours, or overnight, until every pop is solid through the center. Warm only the outside of each metal mold briefly with cool-to-lukewarm water, then pull the stick straight to release.
Nutrition
Notes
Tried this recipe?
Let us know how it was!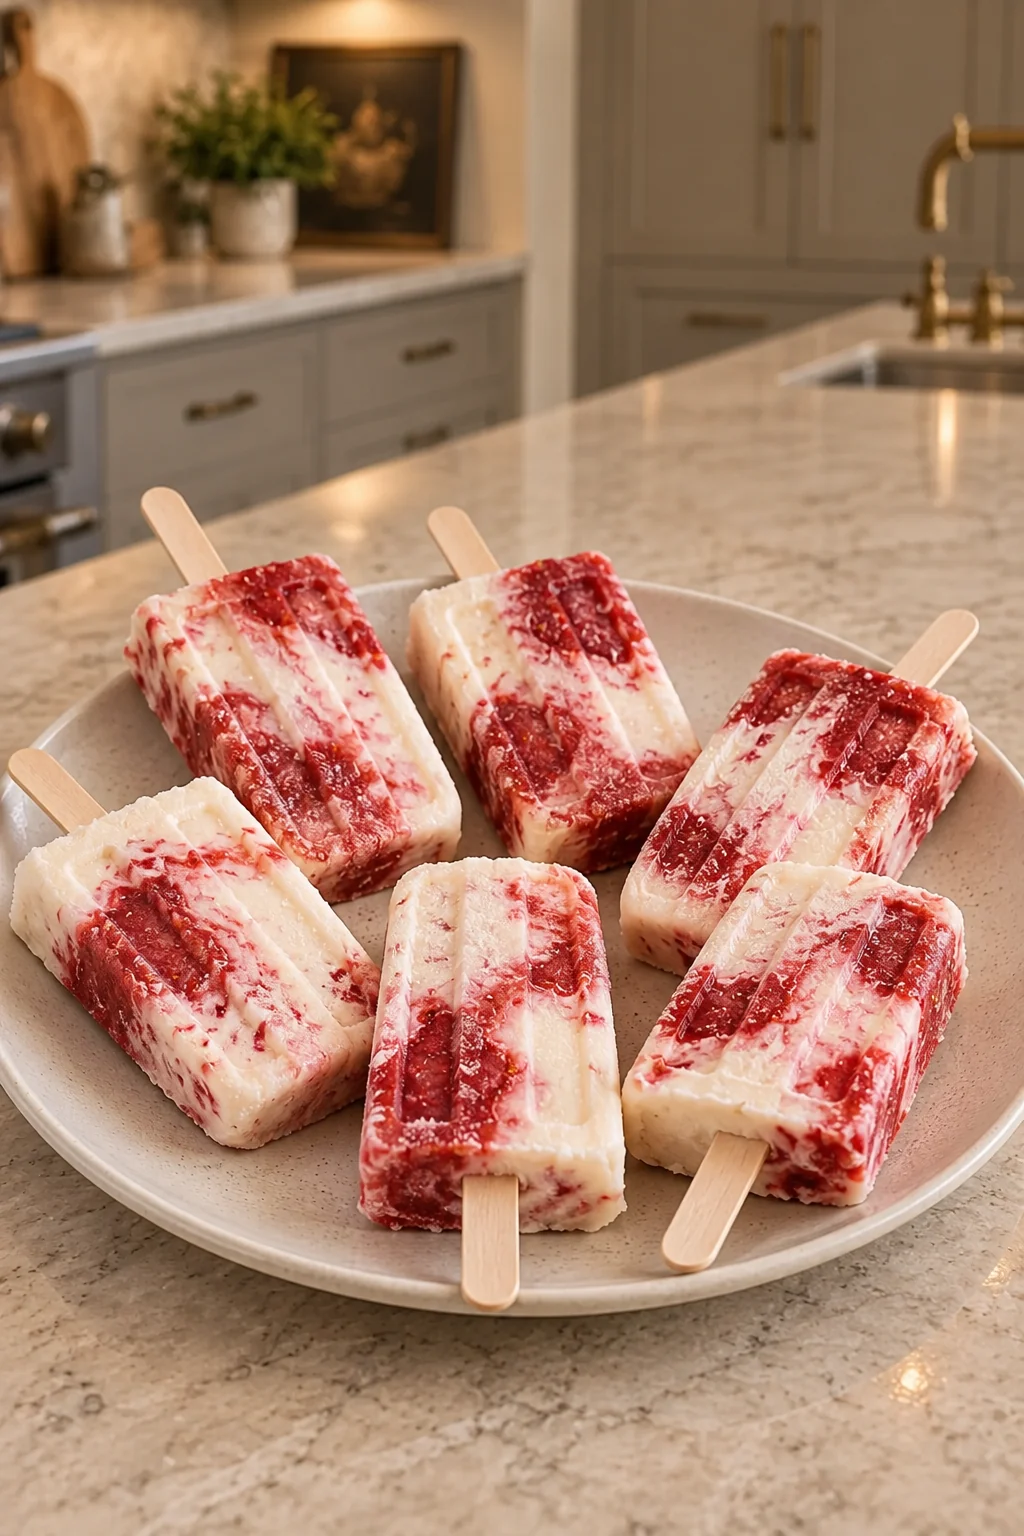

Leave a comment